PGJ Rotary Sprinklers Installation and Adjustment Instructions
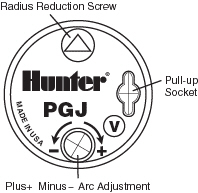
Arc Adjustment
(All PGJ adjustable heads are PRESET to approximately 40°)
- Rotate the nozzle turret counterclockwise to the left stop.
- Now, rotate the nozzle turret clockwise to the right stop. This is the fixed side of the arc. The nozzle turret must be held in this position for all arc adjustments.
To Increase Arc
- Insert the key end of the Hunter wrench into the adjustment socket on top of the sprinkler.
- While holding the nozzle turret at the right stop, turn the wrench clockwise.
- Wrench will stop turning when adjusted to the maximum arc (360°). Do not go past this stop.
- Adjust to any arc between 40°-360°.
To Decrease Arc
- Insert the key end of the Hunter wrench into the adjustment socket.
- While holding the nozzle turret at the right stop, turn the wrench counterclockwise.
- Wrench will stop turning when adjusted to the minimum arc (40°). Do not go past this stop.
- Adjust to any arc between 40°-360°.
Radius Adjustment
To Decrease Radius
- Turn nozzle-retainer/range-adjustment screw clockwise using hex end of Hunter tool or slot screwdriver. This can reduce radius up to 25%.
- If an even smaller radius is desired, install a smaller nozzle. This will affect precipitation rate.
To Increase Radius
- Turn nozzle-retainer/range-adjustment screw counterclockwise using hex end of Hunter tool or slot screwdriver.
- If larger radius is desired, install larger nozzle. This will affect precipitation rate.
Precipitation Rate Adjustment
To Increase Precipitation
- Remove existing nozzle.
- Replace with larger size.
- Adjust radius.
To Decrease Precipitation
- Remove existing nozzle.
- Replace with smaller size.
- Adjust radius. Note: Undamaged nozzles are reusable.
Nozzle Installation
- Insert the plastic key end of the Hunter wrench into the lifting socket of the sprinkler and turn 90°. Pull the riser up to gain access to the nozzle socket.
- Using the hex key of the Hunter wrench, turn the radius adjustment screw counterclockwise to be sure it is not blocking the nozzle socket opening. If a nozzle is already installed, it can be removed by backing out the adjustment screw and turning on the water, or by prying outward under the nozzle.
- Slip the desired nozzle into the nozzle socket. Note that the socket is angled up 25° so that the nozzle range screw threads directly down. Then tighten the nozzle range screw. The arrow on the rubber cover will always indicate the location of the nozzle and direction of the water flow when the sprinkler is retracted.
 |
 |
|
|
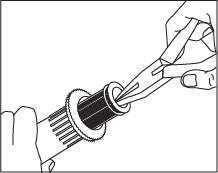
Removing Filter Screen for Cleaning |
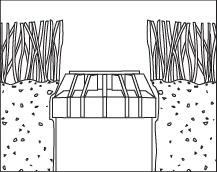
Proper Installation Height |